ATmega 1284p
This website shows how I built a minimal DIY microcontroller system based on the ATmega 1284p on a breadboard and then programmed it using gcc and an USB-ISP adapter to blink an LED.
Here's the 1284p's pinout from the datasheet:
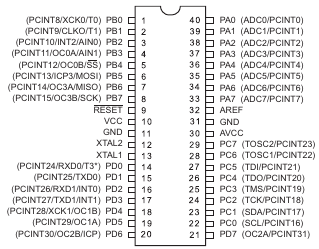
The controller has 4 programmable I/O ports PA-PD with 8 pins each (PA0-7, PB0-7, .., PD0-7). We're going to connect the LED to pin PB0 (pin 1). Here's the schematic:
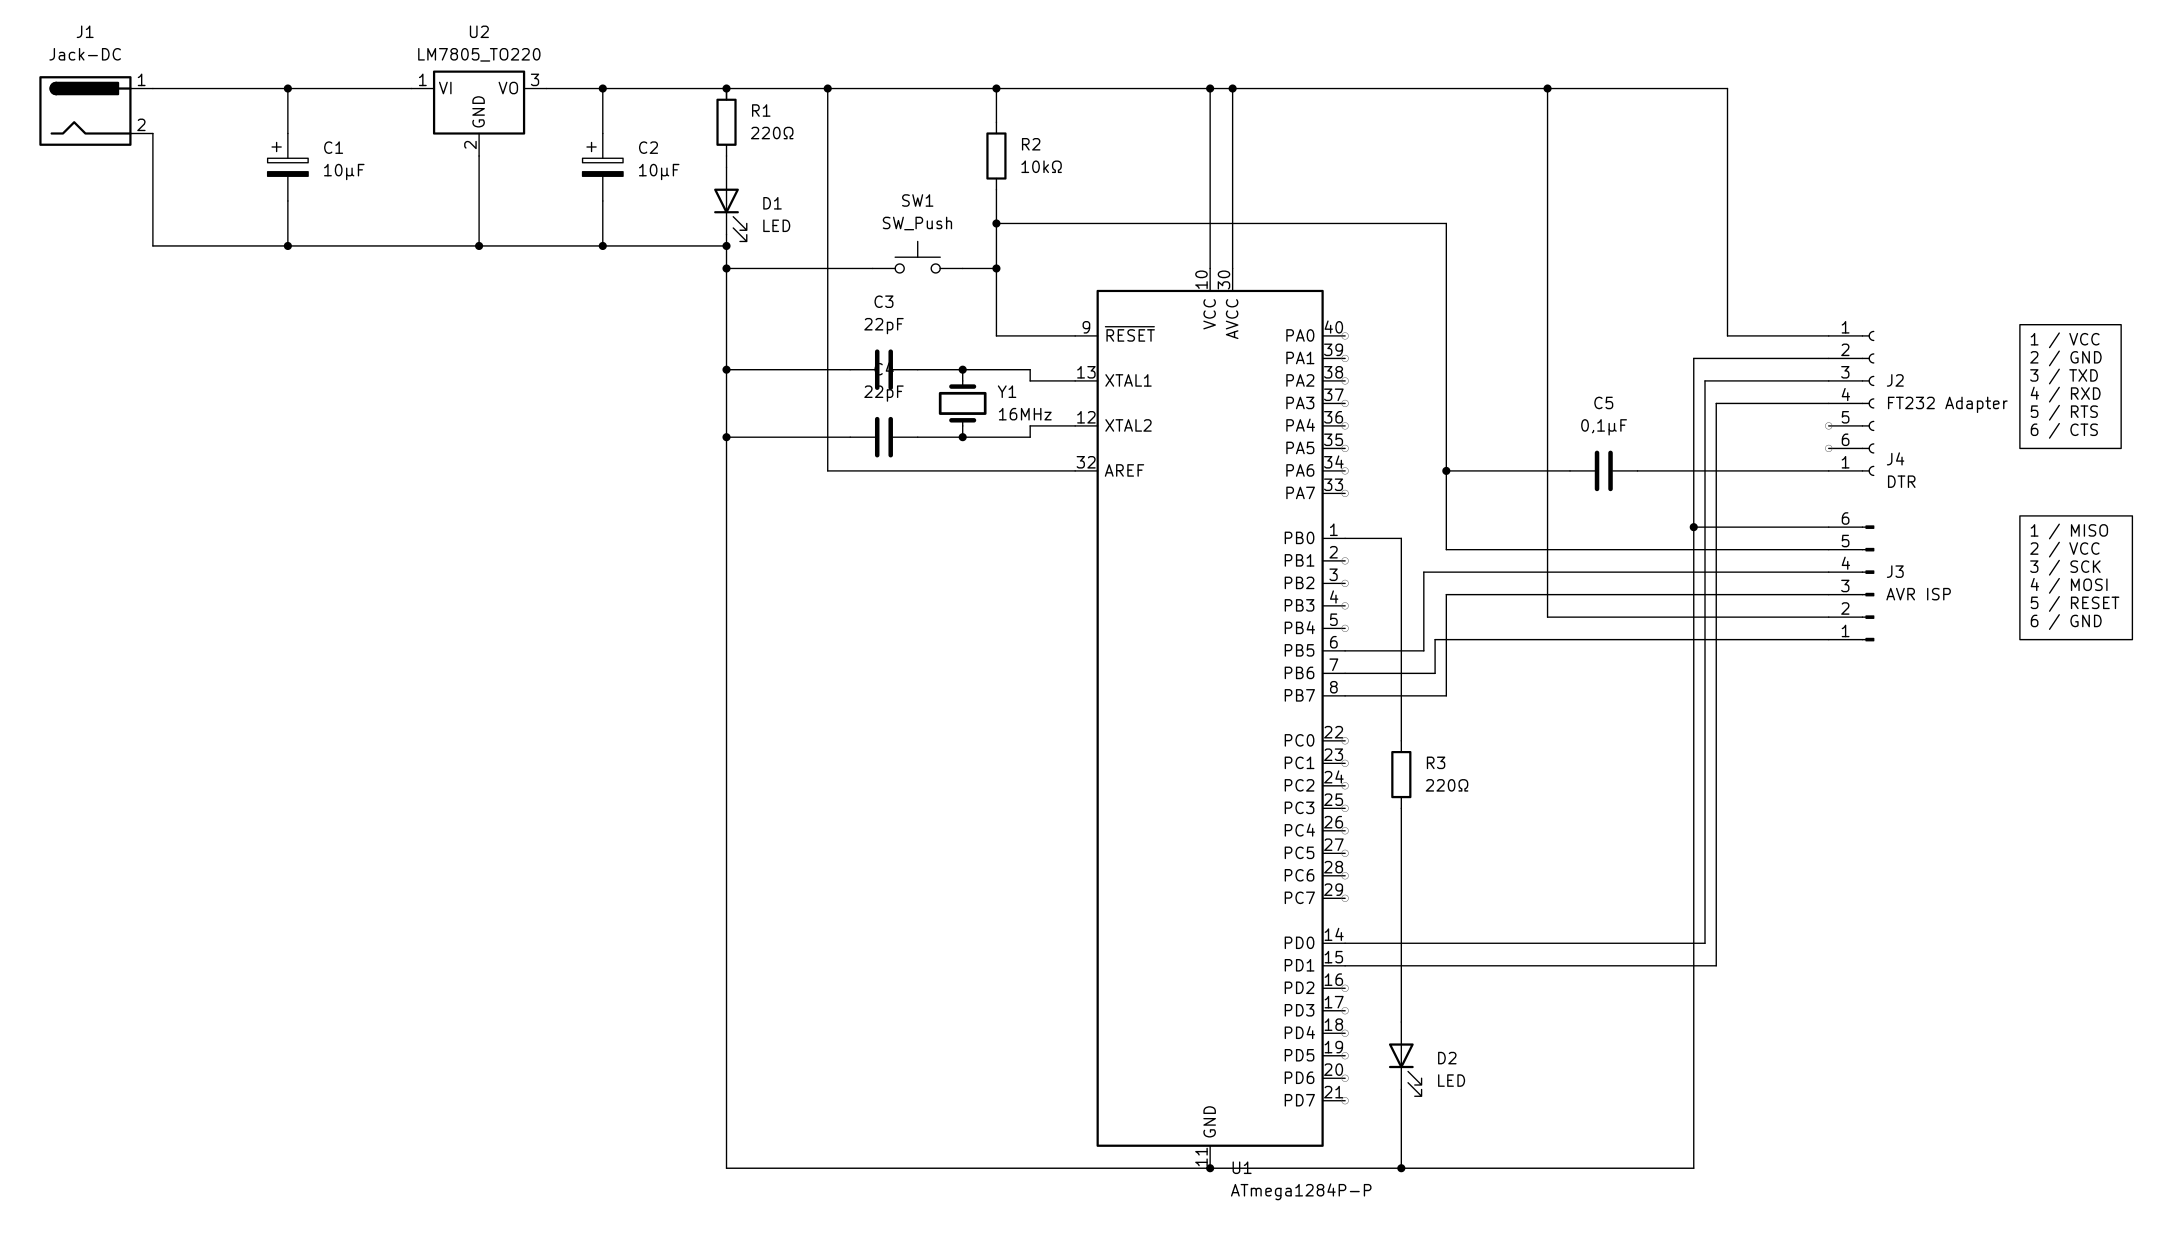
On the right hand side of the schematic you can see connections to an "FT232 Adapter" and to an "AVR ISP".
 :
:
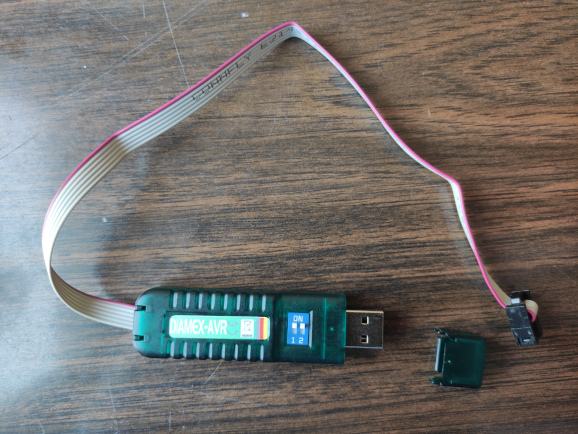
You can use this programmer to either directly flash your own programs onto the chip or to flash a bootloader. If you flash a bootloader, you can use the Arduino IDE with all its comforts to program the system.
 for this:
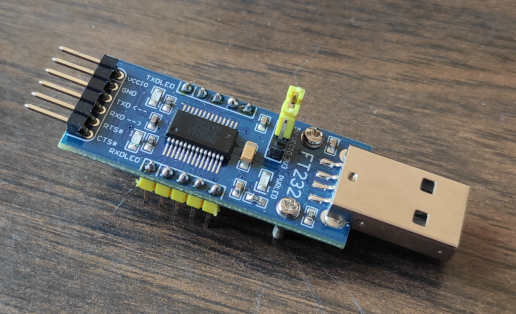
Even though I prefer using the AVR ISP interface with avrdude rather than the FT232-UART interface with the Arduini IDE, I've implemented both in my schematic because I like to have the options
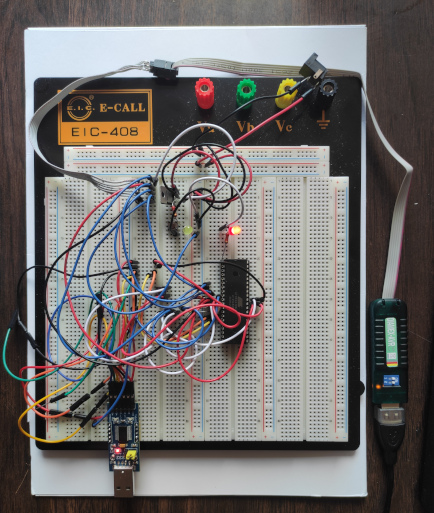
It is a bit messy because I added another LED and a switch for testing purposes. Other than that, this is a minimal, completely functional microcontroller board.
Here's the program "blink.c" that switches the LED at pin PB0 on and off at a rate of 500ms:
Configures the direction of pin PB0 to output.
The line
Sets pin PB0 to 1.
The line
Sets pin PB0 to 0.
In order to compile the program, I'm using the following Makefile:
Saving blink.c and Makefile in the same directory and then invoking "make" in that directory should compile the program to blink.hex which can be flashed to the ATmega1284p chip.
The nice thing about this Makefile is that it separates the compilation of (potentially multiple) *.c source files to object (*.o) files and the linking of those object files to the resulting program. This allows you to have multiple source files which helps organizing bigger projects.
I'm using avrdude to flash the program via the USB-ISP programer. Installing avrdude under Ubuntu is easy:
The blink program will be flashed and automatically started. avrdude's output looks like this on my system:
That's it
Just as a proof, this is what my microcontroller breadboard with the running blinking LED program looks like:
Downloads:
Here's the 1284p's pinout from the datasheet:

The controller has 4 programmable I/O ports PA-PD with 8 pins each (PA0-7, PB0-7, .., PD0-7). We're going to connect the LED to pin PB0 (pin 1). Here's the schematic:

On the right hand side of the schematic you can see connections to an "FT232 Adapter" and to an "AVR ISP".
AVR ISP
All AVR controllers support ISP (in-system-programming). All you need to do is to get an USB programmer and connect it to the correct pins of the controller, just like in the schematic. I've got the Diamex USB-ISP Programmer Stick :
:
You can use this programmer to either directly flash your own programs onto the chip or to flash a bootloader. If you flash a bootloader, you can use the Arduino IDE
 with all its comforts to program the system.
FT232 UART
The Arduino IDE talks to the chip via a UART interface which is available in my schematic via a USB-to-UART adapter. I've got the Waveshare USB UART Board for this:
Even though I prefer using the AVR ISP interface with avrdude
 rather than the FT232-UART interface with the Arduini IDE, I've implemented both in my schematic because I like to have the options
The Breadboard
Here's my system on a breadboard:
It is a bit messy because I added another LED and a switch for testing purposes. Other than that, this is a minimal, completely functional microcontroller board.
Writing and Compiling the Blinking LED C Program
I'm using Ubuntu Linux. You can easily use the apt package manager to install the AVR-enabled gcc crosscompiler:sudo apt install gcc-avr binutils-avr avr-libc gdb-avr
Here's the program "blink.c" that switches the LED at pin PB0 on and off at a rate of 500ms:
#define F_CPU 8000000L

#include
#include

// set port direction for output
#define output(directions,pin) (directions |= pin)

// set port direction for input
#define input(directions,pin) (directions &= (~pin))

// set port pin
#define set(port,pin) (port |= pin)

// clear port pin
#define clear(port,pin) (port &= (~pin))

// test for port pin
#define pin_test(pins,pin) (pins & pin)

// test for bit set
#define bit_test(byte,bit) (byte & (1 << bit))

#define led (1 << PB0)
#define led_port PORTB
#define led_direction DDRB

int main( void )
{
   output( led_direction, led );

   while( 1 )
   {
      set( led_port, led );
      _delay_ms( 500 );
      clear( led_port, led );
      _delay_ms( 500 );
   }
}
The line output( led_direction, led );
Configures the direction of pin PB0 to output.
The line
set( led_port, led );
Sets pin PB0 to 1.
The line
clear( led_port, led );
Sets pin PB0 to 0.
In order to compile the program, I'm using the following Makefile:
all: blink.hex

%.o: %.c
	avr-gcc -Wall -g -Os -mmcu=atmega1284p -c $< -o $@

%.bin: %.o
	avr-gcc -Wall -g -Os -mmcu=atmega1284p -o $@ $^

%.hex: %.bin
	avr-objcopy -j .text -j .data -O ihex $< $@

clean:
	rm -f *.o
	rm -f *.bin
	rm -f *.hex
Saving blink.c and Makefile in the same directory and then invoking "make" in that directory should compile the program to blink.hex which can be flashed to the ATmega1284p chip.
The nice thing about this Makefile is that it separates the compilation of (potentially multiple) *.c source files to object (*.o) files and the linking of those object files to the resulting program. This allows you to have multiple source files which helps organizing bigger projects.
Flashing the Program
I'm using avrdude
 to flash the program via the USB-ISP programer. Installing avrdude under Ubuntu is easy:
avrdude -p atmega1284p -c avrisp2 -U flash:w:blink.hex -P /dev/ttyACM0
The blink program will be flashed and automatically started. avrdude's output looks like this on my system:
chnowak@chnX200:~/Programming/AVR/blink$ avrdude -p atmega1284p -c avrisp2 -U flash:w:blink.hex -P /dev/ttyACM0

avrdude: AVR device initialized and ready to accept instructions
avrdude: device signature = 0x1e9705 (probably m1284p)
avrdude: Note: flash memory has been specified, an erase cycle will be performed.
         To disable this feature, specify the -D option.
avrdude: erasing chip
avrdude: reading input file blink.hex for flash
         with 212 bytes in 1 section within [0, 0xd3]
         using 1 page and 44 pad bytes
avrdude: writing 212 bytes flash ...

Writing | ################################################## | 100% 0.19 s

avrdude: 212 bytes of flash written
avrdude: verifying flash memory against blink.hex

Reading | ################################################## | 100% 0.09 s

avrdude: 212 bytes of flash verified

avrdude done.  Thank you.
That's it 
Just as a proof, this is what my microcontroller breadboard with the running blinking LED program looks like:
Downloads:
- blink.tar.gz
(617 bytes) The blink program's source code with Makefile
- ATmega1284_KiCad.tar.gz
(16KB) The KiCad schematic
Copyright (c) by chn.
All material available on this website is free of charge for personal use.
There are no ads and no affiliate links on this website.
No cookies are used. You are not being tracked.
Legal Notice


All material available on this website is free of charge for personal use.
There are no ads and no affiliate links on this website.
No cookies are used. You are not being tracked.
Legal Notice


